
ZeroBorg
Forums:
Hi from a new ZeroBorg owner!
Is there a ZeroBorg forum here anywhere or do we need a new one creating?
I'm not exactly a novice but I'd like to have a simple getting started manual for my ZeroBorg to answer questions such as:
1) Does the PP3 battery connection power just the PiZero and ZeroBorg or will it power some motors too?
2) What voltage batteries should / can be used on the 'Power In' screw-in socket?
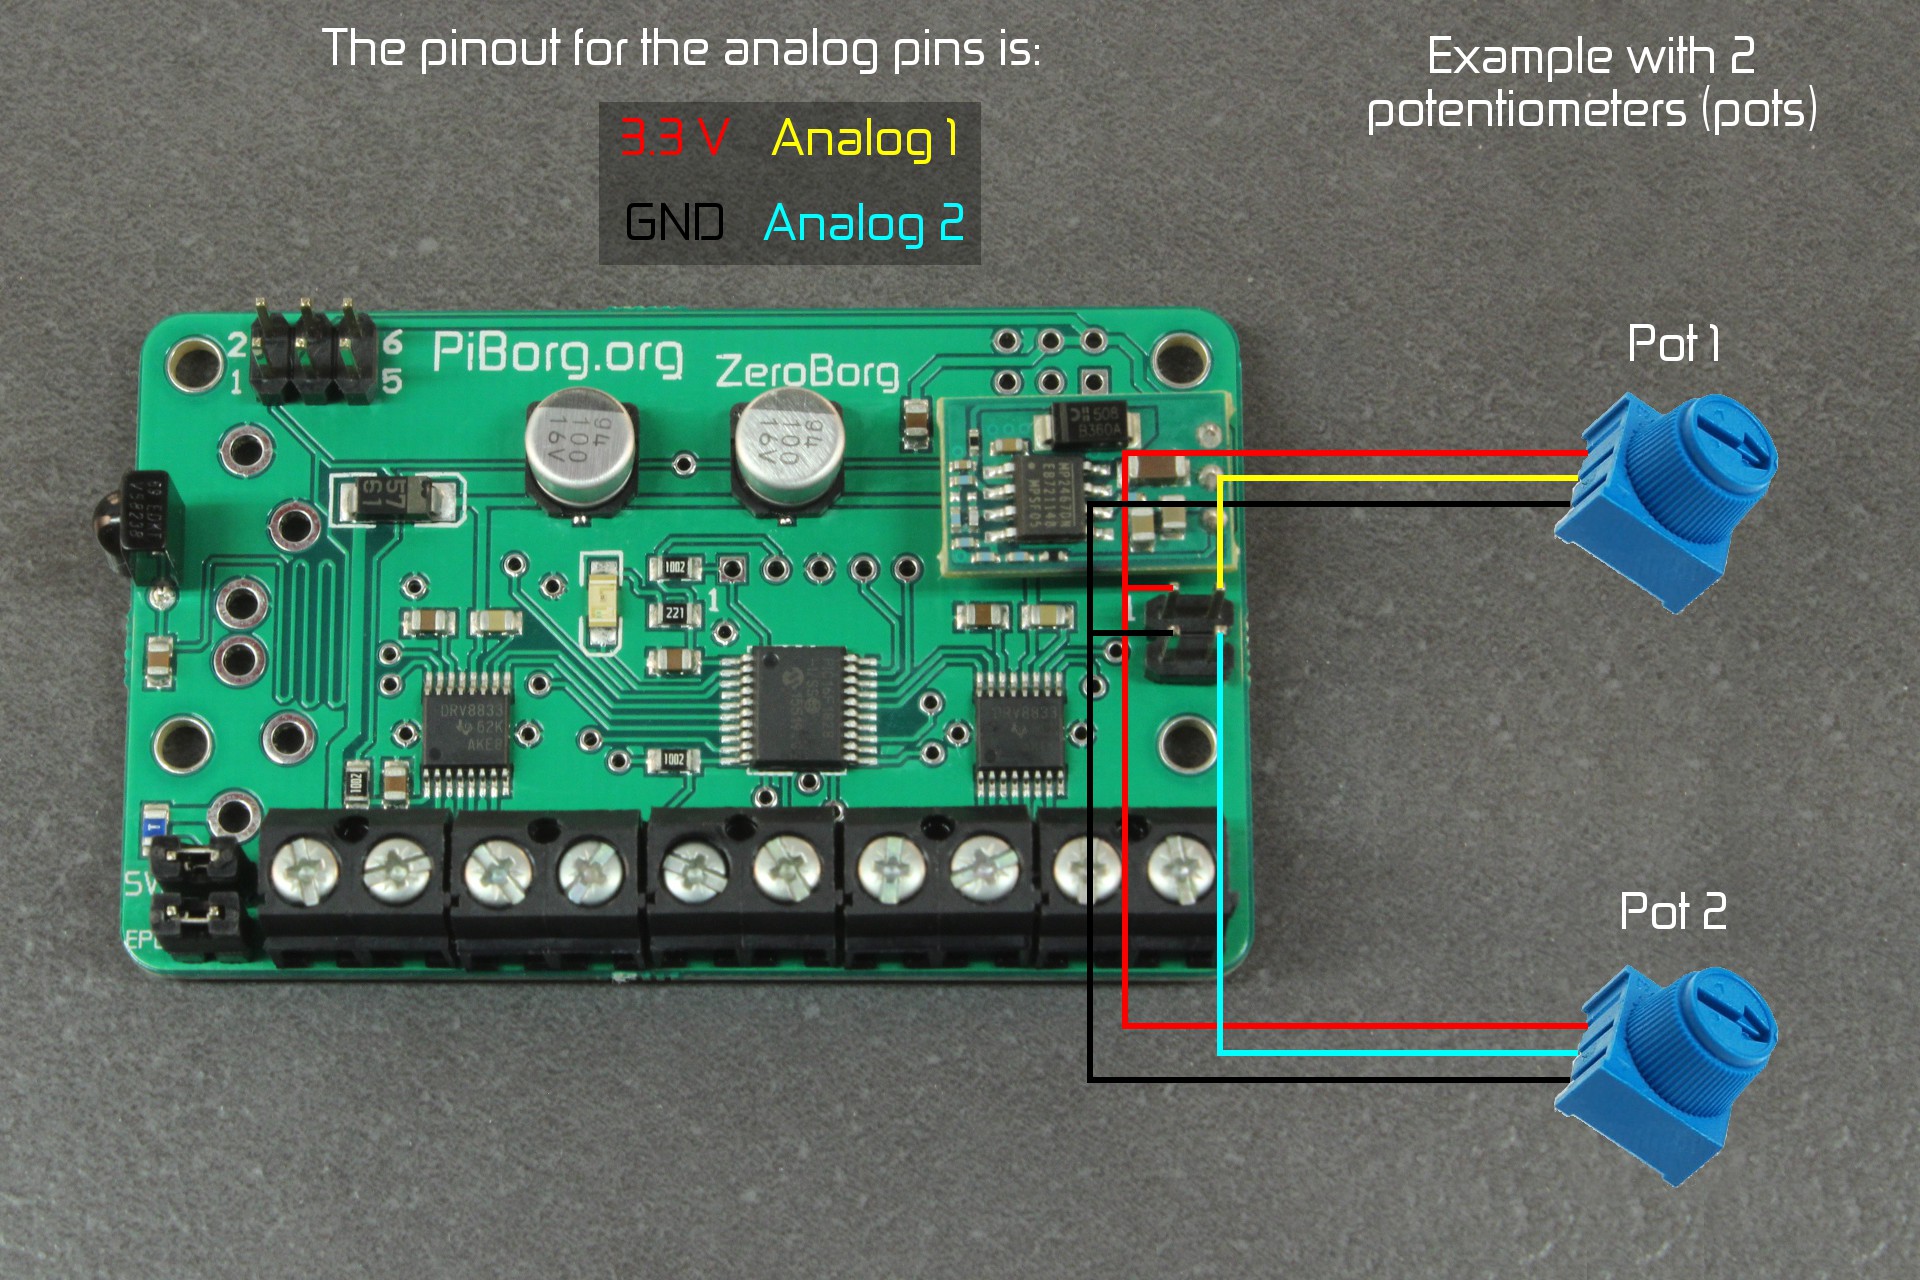
3) Where are in the analogue inputs? (I think I might know, but would like confirmation).
4) What are the two removable jumpers for?
I could seem to find any of this info on the git repository or the PiBorg website, so any help appreciated.
Cheers, Martyn
- Log in to post comments


piborg
Mon, 06/27/2016 - 10:51
Permalink
You beat us to it :)
You beat us to it :)
We are currently working on the full website page, we expect all of the information to be up this week.
With regards to your questions:
The Pi Zero will only be powered off the ZeroBorg with a KS2 / KS3.
For a KS2 / KS3 you need 7-10.8V otherwise the Pi Zero will not be powered.
See the image below for the pinout.
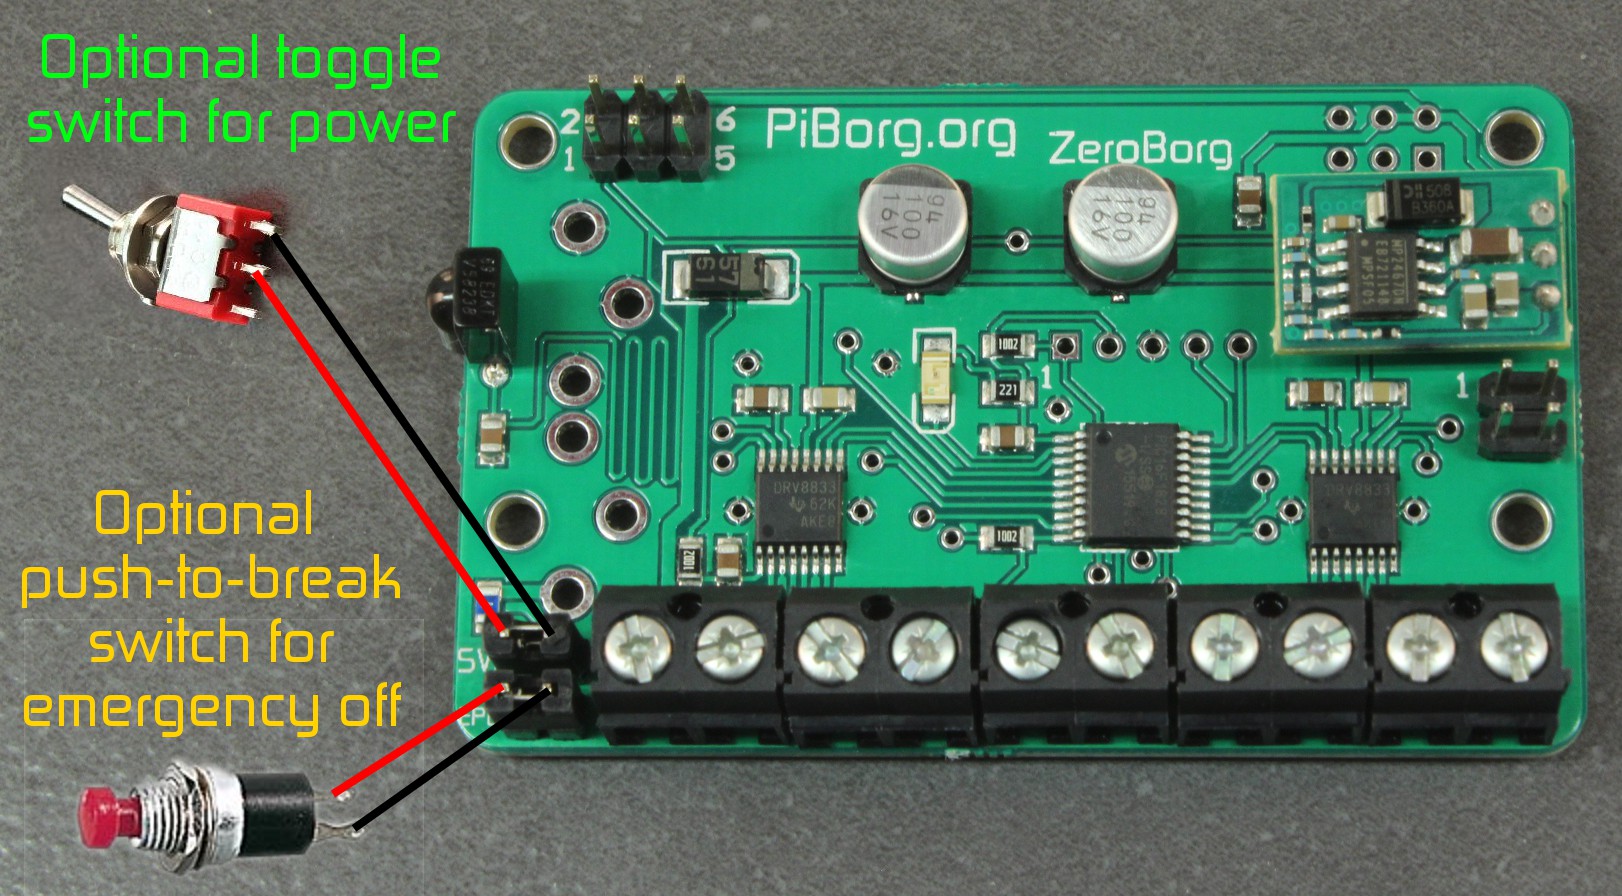
The SW jumper can be replaced with a power switch (toggle).
The EPO jumper can be replaced with a emergency off switch (push-to-break).
Without a switch attached the jumper should be left on.
Analog pinout:
Optional switches:
Univibe
Mon, 07/04/2016 - 19:59
Permalink
Pots
It's a brilliant idea with the power pins. But what can the pots be used for?
Cheers Sebastian
piborg
Tue, 07/05/2016 - 10:32
Permalink
Uses for pots
There are quite a few different uses for pots in a project, here are some which come to mind:
In short the main uses of them really boil down to two categories:
Univibe
Fri, 07/08/2016 - 08:05
Permalink
Pots
Thanks a lot!
That answer really gave me some new ideas.
The possibility to give the code mecanical feedback thru pots would let one build a sensor out of anything to sens; anything you need that isn't just on/off.
Exciting!
Cheers.
andyu
Sat, 07/02/2016 - 01:00
Permalink
KS2 power
Is it safe to power the pi zero with its own battery pack whilst having the borg zero having the PP3 connected?
My reason for asking is that running the motors at full power appears to drop the power the pi zero receives , resulting in rebooting.
Pi zero ... most recent version with fresh install of most recent raspbian.
Univibe
Sat, 07/02/2016 - 08:12
Permalink
Another power question
Hi! While testing and programming Zero, Borg & Ultra I need a powersource... So... 9V adapter, but what currency? Is 2.5A enough?
Regards
Sebastian
piborg
Sat, 07/02/2016 - 16:20
Permalink
Required current
It all depends what you have connected to the ZeroBorg and UltraBorg.
I would expect that with four small servos and four small DC motors that a 2.5A power supply would be sufficient.
If you already have the supply the best thing to do is go ahead and try it.
If 2.5A is not enough then the Raspberry Pi will just get rebooted when the motors draw too much current.
It will not cause any permanent damage.
Univibe
Sun, 07/03/2016 - 11:58
Permalink
Thank you. I'll try it out.
Thank you. I'll try it out.
Another question is... is it possigle to run 2 motors and one stepper/servo direct from the board?
Kind Regards! Sebastian
piborg
Sun, 07/03/2016 - 18:42
Permalink
ZeroBorg motors
It is possible to connect and use two DC motors and one stepper motor at the same time.
The stepper will need to use two of the four motor outputs, we recommend either M1 / M2 or M3 / M4.
Univibe
Sun, 07/03/2016 - 20:09
Permalink
ZeroBorg motors
That is.. som kind of.. really cool if one want to build something really small. :-)
I have made 2 hardware hacks but I need to take some pictures of it.
Cheers Sebastian
piborg
Sat, 07/02/2016 - 16:15
Permalink
KS2 powering
I would not recommend powering the Rasperry Pi Zero from both the USB and the ZeroBorg at the same time.
It may all work fine, but it might damage the ZeroBorg if you are unlucky.
What you could try is:
We do this on DiddyBorg Red Edition and it seems to work well.
The regulator is the tiny PCB with three pins connecting it to the rest of the ZeroBorg.
By using a second battery like this the ZeroBorg will be able to deliver more current to both the motors and the Pi Zero.
Make sure both batteries are the same and that they are both fully charged.
Weja
Sun, 07/03/2016 - 19:50
Permalink
Missing Feature
Hello ,
is there a way to bring the motors in a "break state" ?
Like a shortcut between the two motor pins, as against to simple power off ?
Weja
piborg
Mon, 07/04/2016 - 10:39
Permalink
Motor braking
Unfortunately no, the ZeroBorg does not provide a function to change between free-wheeling and breaking.
If you require breaking then two of our other boards provide this feature already:
Univibe
Fri, 07/08/2016 - 08:13
Permalink
Zerohack 1
Hi!
One problem solved so I'm just sharing it.
I needed to mount the Zeroborg flat and have the battery elsewhere.
The problem was that to daisy chain to the Ultraborg. Solution?
Soldering a angled 6-pin on the inside
piborg
Fri, 07/08/2016 - 10:08
Permalink
Angled 6-pin
That is a great idea, we did not think of that!
I will see if we can get some stock of angled 6-pin connectors in case anyone else wants to do this ^_^
Univibe
Sun, 07/10/2016 - 22:55
Permalink
6-pin
Hi! I'm glad that you liked it.
I will use the mod for other GPIO pins so I will need a supply :-)
Here is hack no. 2 This picturei is just a test. The idea is to have four threaded rods (made of nylon of course) to mount boards together with a nut on each side. The good part is.... By drilling four holes in anything you could mount the borg and/or boards to anything/anywhere.
Cheers! Sebastian