
Coupple questions about monsterborg kit
Forums:
Hi all,
Couple questions:
Q1. I purchased the lynxmotion al5a robot arm kit, they say it weighs 1-2 kg ,do you think it can be easily mounted on one side of the monsterborg?
Q2. Is it possible to change the wheels to air-filled type, and would that improve grip and reduce sliding around?
Thanks so much!
- Log in to post comments


piborg
Fri, 05/21/2021 - 16:52
Permalink
MonsterBorg questions
Q1. I purchased the lynxmotion al5a robot arm kit, they say it weighs 1-2 kg ,do you think it can be easily mounted on one side of the monsterborg?
The weight will not be a problem, we have driven MonsterBorgs carrying about 4 Kg without much impact on speed or control :)
Mounting is a slightly different problem. The only available mounting points are on the top of the chassis (see image below). If the arm is mounted to these it should be fairly stable while driving as the bulk of the arm's weight will be within the outer dimensions of the wheels.
Q2. Is it possible to change the wheels to air-filled type, and would that improve grip and reduce sliding around?
It should be possible, unfortunately we do not have any air-filled wheels in our stock to offer you.
Grip largely depends on the combination of tyre pattern and the surface the robot is driving over, broadly speaking how the tyre is filled will be less important than these things. MonsterBorg grips fairly well on most surfaces, but grip can be potentially improved with:
The standard tyres are balanced between these two types so they provide decent grip on a large number of surfaces.
These are the hub dimensions for the MonsterBorg kit if you want to try and find alternative wheels that fit: https://www.piborg.org/image/catalog/PIBORG/blog/hub-dimensions.pdf
The standard wheels are 105mm in diameter including the tyres, with 120mm distance between the centre of the wheels (see image below).
icemonk
Thu, 05/27/2021 - 23:02
Permalink
Alrighty i placed an order on
Alrighty i placed an order on the ebay store on May.21, can u confirm you received it? Also do you know how long it usually take for shipments to CANADA?
Thanks!
piborg
Fri, 05/28/2021 - 00:54
Permalink
Ebay order
Really sorry about the delay. We normally get a notification from eBay when a sale is made, but not this time :(
I have just checked and we do have your order. I have booked a DHL Express pickup for tomorrow, it usually takes 2-3 business days to ship to Canada with this service.
We will need a phone number for the shipment. Could you please provide one to us via email
I will add the tracking number to the eBay order when the package has been picked up.
icemonk
Fri, 05/28/2021 - 01:07
Permalink
no worries i sent that phone
no worries i sent that phone number by email. cheers!
piborg
Fri, 05/28/2021 - 01:22
Permalink
Thanks
Email received, thanks :)
icemonk
Mon, 06/28/2021 - 21:54
Permalink
Update
Hi, thanks, i have received the thing and completed the assembly. Unfortunately, i messed up the last step, and put the battery strap around the outside of the piborg lid (instead of inside like it was in the pic...), and now it seems stuck :( So i would need to order a replacement. other than that, everything seems to be in order, I was able to go forwards, backwards, make a slight turn, take a pic using 'raspistill' etc. One question i have, is that: The light stays 'yellow' colour while in operation, but according to the installation guide it should be 'green' colour? Note i am using new Enigizer AA MAX Double-AA batteries.
Thanks,
icemonk
piborg
Tue, 06/29/2021 - 11:28
Permalink
LED battery monitoring
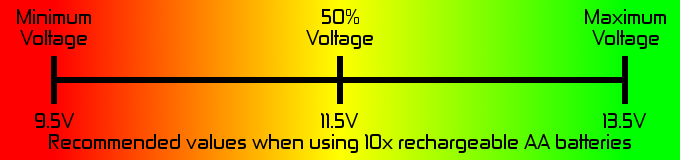
The LED on the MonsterBorg is used to indicate the current battery voltage by default. The colours are based on what the minimum / maximum expected voltages are configured for.
The ThunderBorg board ships with the full voltage range of the board as its default values:
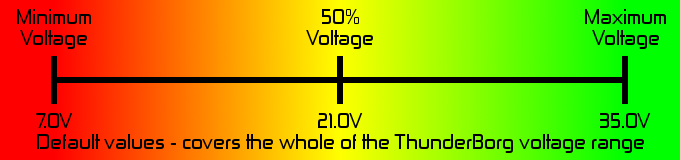
The current battery voltage can be checked by running the
tbReadBattery.pyscript using a terminal or SSH:You can change the voltage range displayed by running the
tbSetBatteryLimits.pyscript:For the 10x rechargeable AA battery pack on MonsterBorg we find a range of 9.5 to 13.5 V works well:
The battery strap can be a bit difficult to remove, especially when new :)
There is a release button that needs to be pushed inward while pulling the cable through the head part so it loosens battery pack. The button might be a bit stiff, but when pressed far enough in the cable should be released.