
MonsterBorg - The ultimate Pi robot
Get your MonsterBorg to autonomously follow a coloured track
Driving a MonsterBorg around yourself can be fun, but having it drive all by itself is much more exciting. There are many ways to get a robot to drive on its own, such as line following sensors, ultrasonics, lidar, or even GPS. Since MonsterBorg can see using a camera and process those images using the Raspberry Pi we can get MonsterBorg to drive from sight alone :)
In this example we will get MonsterBorg to follow a coloured track all by itself!
Parts
In order to run this script you will only need:
- A MonsterBorg
- A Raspberry Pi camera so the robot can see
Downloading the code
To get the code we will clone the GitHub repository to the Raspberry Pi.
In a terminal run the following commands
cd ~
git clone https://github.com/piborg/monster-self-drive.git
The code is entirely written in Python and makes extensive use of OpenCV to access the camera and process the images. It uses the Video4Linux driver to get images from the Raspberry Pi Camera and then looks for the track you have marked out to follow.
The code structure
The code is split into four Python scripts, each responsible for a set task.
ThunderBorg.py- The standard ThunderBorg library, used to control MonsterBorg's motorsSettings.py- Our settings for the MonsterBorg to drive with, also holds some shared data between the scriptsMonsterAuto.py- The main starting script, controls all of the threads and gets things startedImageProcessor.py- The complex part, this script talks to the camera, processes the images, then decides on how much power to give the motors
In general you should be able to get everything running just by changing Settings.py to match your track / route so that your robot knows what to follow. Anyone that wants to see how the processing works or to make improvements will want to look at ImageProcessor.py as well.
How the code works
The code attempts to follow a course marked out using a distinctive colour. We are only using the forward facing camera fitted to the MonsterBorg, no other line or distance sensors are needed.
The track itself should be made up of a continuous line in the same colour. Bright colours tend to work best, particularly red, green, or blue. Avoid any colours which have too much in common with the rest of the area to help the MonsterBorg stay on course. We would recommend avoiding black in particular as it can easily be confused with shadows. Good lighting will help, even levels of light with minimal shadows and bright spots are best.
The track can be either thin or thick depending on your needs. The thickest width we would recommend is about 60 cm (2 ft) and the smallest about 2.5 cm (1 in), something around 30 cm (1 ft) works rather well. With narrower tracks you will need the MonsterBorg to follow the course more precisely to make sure it does not get lost. Wider tracks can follow the course in a looser fashion, but will likely stray further from the central line of the track.
Check out Formula Pi to get an idea of what a fully walled track can look like. There are also videos of how MonsterBorgs can perform on this track from just the camera image on our YouTube channel.
Getting setup
Unlike most of our examples, this code needs a bit of adjustment before it is ready to go. The default settings are setup for following one of the red lanes on our Formula Pi track. You should be able to follow any nice obvious colour, but bright colours will work better.
Before starting you will want a connection to your MonsterBorg where you can see graphical output, such as VNC, an actual monitor, or SSH with X11 forwarding enabled. This will allow you to see what effect the changes have on what the robot can see. It is best to do the setup on the MonsterBorg itself when sat on the floor so that the camera height is correct for your track.
From the Raspberry Pi begin by running the main script:
cd ~/monster-self-drive
./MonsterAuto.py
Your robot should start processing the camera but it will not start moving yet.
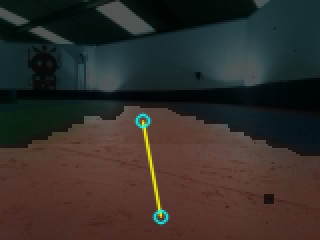
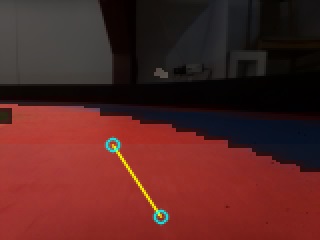
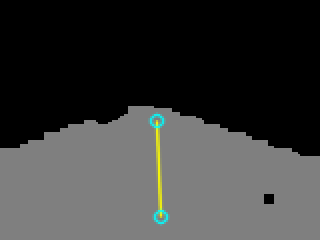
The image shown has a few parts of interest:
- The bright areas are those which match the set colour
- The dark areas are those which do not match the set colour
- The two cyan circles are the points we have placed the center of our lane at
- The yellow line is what we are trying to follow
If everything is setup correctly for the track then you should see the correct area highlighted. Otherwise we need to set the image up for the track.
Setting the track colour
First end the script using CTRL+C if it is still running. All of the settings are in Settings.py so open it up in your favourite text editor.
The lines you are looking for are:
minHuntColour = ( 80,   0,   0)   # Minimum RGB values for...
maxHuntColour = (255, 100, 100)   # Maximum RGB values for...
erodeSize = 5                     # Size of the erosion used...
The first, minHuntColour, is the minimum red, green, and blue levels that will be highlighted. The second, maxHuntColour, are the maximums to be highlighted. Your track colour as seen by the camera should be between these values. A wider range will deal better with differing light levels, but a narrower range will have less trouble with mistaking the surroundings for the track.
The third value, erodeSize, is a little harder to explain. With a value of 1 each pixel is highlighted based only on what is described above. With a value of 2 each pixel looks at neighbouring pixels to decide if it is just noise (a lone spot) or really part of the track. As you increase the number it will remove more unintended noisy points, but it will also narrow the width of the real highlighted track.
If you are struggling to see what is highlighted you can set the overlayOriginal setting further down to False. This will show matched areas as grey and unmatched as black.
Each time you make a change save the Settings.py file and run MonsterAuto.py again to test the change. Once the highlighted region is approximately correct we can move on to positioning the tracked points in the correct places.
Setting the tracked points
The code works by identifying the track in two places, a near point and a far point. On the displayed image these are shown by the two cyan circles. If there are less than two circles shown then the MonsterBorg is not finding the track at both targets on the image and the code will not plot the yellow line to indicate the calculated location of the track.
If you are not seeing both circles then there are three possible causes:
- The track is not fully in view (unlikely during setup)
- The highlighted region does not cover the track properly
- The Y positions used to look for the track are wrong
If the highlighting is incorrect go back to the track colour setup and correct that first. Otherwise we need to move the target positions to better values. The settings we need to edit are:
targetY1 = int(imageHeight * 0.9)  # Y location for the closest point...
targetY2 = int(imageHeight * 0.6)  # Y location for the furthest point...
Our defaults are set to having the near point at 90% (0.9) of the way down the image and the far point at 60% (0.6) of the way down the image. Larger values are closer to the bottom of the image. You should keep the near point closer to the bottom of the image as some of the code depends on it being the closest to where the MonsterBorg currently is.
You may also wish to alter some of the general camera settings at this stage. Check the documentation from the Raspberry Pi foundation or from you camera manufacturer to find out what resolutions and frame rates are available. If the image seems to be rotated by 180° then change flippedImage from True to False to correct the rotation.
Once you have the two circles showing reliably you are ready to move on to getting your MonsterBorg moving on its own :)
Running the MonsterBorg
In order for the MonsterBorg to start driving itself all we need to do is look for the line:
testMode = True # True to prevent the robot moving, False will self-drive
and change the value to False. This will get your robot to run instead of just printing out motor settings.
There may be a few other things that want to be changed to make things go smoothly.
Running without the display
Find this line:
showImages = True # True to show processing images
and change the setting to False. You will need to do this if the robot cannot show images to you otherwise the script will fail to run. This is also necessary when getting the script to run automatically at startup
Stopping the MonsterBorg
If the MonsterBorg is trying to run off or you need to stop the script then this is the best procedure to follow
- Pick the MonsterBorg up so it cannot go anywhere - we recommend this is done by carefully scooping it up from the motors and avoid trapping you fingers in small gaps or moving wheels!
- Block the camera with either your hand or an opaque object
- As it cannot see the track it should gradually slow then come to a stop after a second or so
- If you need to you can place the MonsterBorg back down, keeping the camera vision blocked
- End the script either by using CTRL+C if you can or
sudo killall pythonif needed
If the MonsterBorg does not stop when the camera is blocked (step 2) then either the script has died or the target track colours allow black as valid. In this case it is usually best to place the MonsterBorg on top of something solid with the wheels off the floor such that it cannot move itself. This may be easier to do when the MonsterBorg is placed upside-down.
If the motors have not stopped after ending the script you can force them to stop from a terminal as follows:
cd ~/monster-self-drive
python
import ThunderBorg
TB = ThunderBorg.ThunderBorg()
TB.Init()
TB.MotorsOff()
Speed setting
While you are getting your MonsterBorg to drive in a well-behaved fashion it may be helpful to change the running speed. Start by looking for this line:
currentSpeed = 1.0 # Speed setting used by the control loop
The value set can be anything between 0.0 for no movement at all to 1.0 for full speed. For example 0.6 would be 60% of full speed, probably enough for some gentle testing.
Steering control
This is the big one, where most of the settings actually are. The control is based on two PID loops: one based on the offset from the center of the track, and the other based on how far the track position changes between the two points. In general larger values mean that larger steering changes are applied, with values of 0.00 meaning that part has no effect on the steering.
The major settings are here:
# Control settings
motorSmoothing = 5   # Number of frames to average...
positionP = 1.00     # P term for control based on distance...
positionI = 0.00     # I term for control based on distance...
positionD = 0.40     # D term for control based on distance...
changeP = 1.00       # P term for control based on change...
changeI = 0.00       # I term for control based on change...
changeD = 0.40       # D term for control based on change...
clipI = 100          # Maximum limit for both integrators
Each setting has its own specific role:
motorSmoothing- Averages changes in speed and steering over this many readings. Use larger values to make the overall movement smoother at the expense of being slower to react to changes in the track positionpositionP- Applies steering based on how far the MonsterBorg is from the center of the track right nowpositionI- Applies steering based on how far the MonsterBorg stays from the center of the track over timepositionD- Applies steering based on how much further the MonsterBorg is from the center of the track compared to the last imagechangeP- Applies steering based on how far the track is from straight forward right nowchangeI- Applies steering based on how far the track stays from straight forward over timechangeD- Applies steering based on how much further the track is from straight forward compared to the last imageclipI- Limits the maximum value the twoIsettings above can reach
Tuning these PID loops can be a tricky and confusing exercise, the top voted answer here is probably a good starting point. As there are two sets of PID loops we recommend turning all of the change values to 0.00 and tuning the position values only first. After that you can add in the change values to get the robot to control in a more responsive fashion.
Generally we have found wider tracks need more emphasis on the change values and that narrower tracks rely more on the position values. Using the change values only is usually not a good idea as if the robot strays too far from the center it may only be able to see a single point. When only a single point can be seen the distance based PID loop still works normally, but the change based PID loop gets an input of 0 since the code cannot figure out what the change is :(
There are also some minor settings which can be used to tweak the steering response further:
# Final drive settings
steeringGain = 1.0     # Steering range correction value
steeringClip = 1.0     # Maximum steering value
steeringOffset = 0.0   # Steering centre correction value
These are much simpler but only adjust the output from the calculations above:
steeringGain- Overall gain on the steering values. Can be used to increase or decrease motor levels used for steering, Values of2.0and above will allow full tank steering to be usedsteeringClip- Limit the maximum steering level. On MonsterBorg0.0means none,1.0is full brake steering, and2.0allows full tank steeringsteeringOffset- Apply a correction to steering values so that0.0means straight ahead. Usually not needed but may prove useful if your MonsterBorg is struggling to drive straight
Further reading
If you want to know more about how the code works or how it can be improved there are a some good sources of further reading:
- Find out how the processing works in our Formula Pi code, see the Formula Pi Blog - Image Processing posts
- Learn more about OpenCV and what it can do with the OpenCV-Python Tutorials
- Considering using some smarter AI to control your MonsterBorg? Why not take a look at TensorFlow?
- Building your own track, check out how we built ours, Formula Pi track build information
- Check out some footage of YetiBorgs and MonsterBorgs racing in Formula Pi on our PiBorg YouTube channel
- Want some real images from a MonsterBorg racing around our track? MonsterBorg self-driving footage
- Fancy a challenge? Why not enter next Formula Pi series! See our Formula Pi website for details

