
XLoBorg - Motion and direction sensor for your Raspberry Pi
Main examples
Please note that this installation expects you to be connected to the internet, it will download i2c-tools and python-smbus for using the I²C bus from Python and the command line.You may need to enable I2C first, to do this:
- Enter the following command in a terminal:
sudo raspi-config - Move down to option
8 Advanced Optionsand press ENTER - Move down to option
A7 I2Cand press ENTER - Make sure
Yesis highlighted and press ENTER - When the dialog says I2C is enabled press ENTER
- Make sure
Yesis highlighted again and press ENTER - When the dialog says I2C will be loaded by default press ENTER
- Move right until
Finishis highlighted, then press ENTER
From a terminal enter the following commands:
mkdir ~/xloborg
cd ~/xloborg
wget http://www.piborg.org/downloads/xloborg/examples.zip
unzip examples.zip
chmod +x install.sh
./install.sh
After install.sh has finished you will need to reboot your Raspberry Pi to get the I²C drivers to load, after which you are ready to go.
Manual download: http://www.piborg.org/downloads/xloborg/examples.zip
See here for details on the provided examples.
General usage
All of these examples assume you are in the directory where XLoBorg was downloaded to (start withcd ~/xloborg if you used the instructions above).The examples provided fall into two sections, a library which provides functions for talking to the XLoBorg, and some simple scripts using that library.
To start off you should try running the library as a stand-alone program by calling
./XLoBorg.pyYou should see something like the following:
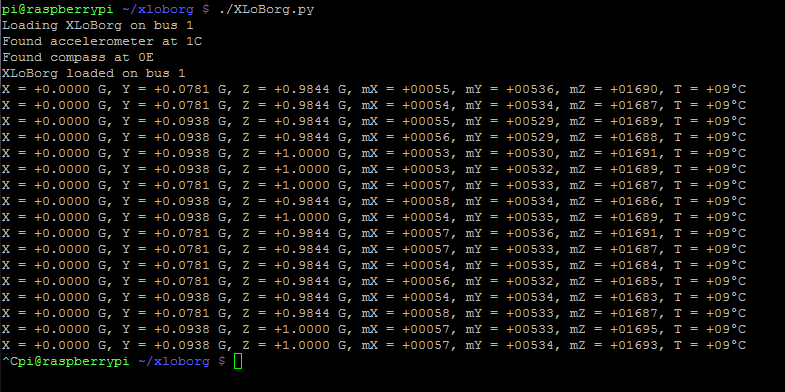
Press CTRL+C to end the program.
If you receive errors and get zero for all output values, please see the troubleshooting page.
Now try moving the Raspberry Pi around, you should see the X, Y and Z values moving around, the faster you move it the larger their sum should get :)
Library functions
The provided Python library is best used directly from Python, but could also be used as an example for writing your own functions in another language.The main functions provided are:
Init(tryOtherBus = True)
Use this function before talking to the XLoBorg to configure the device, it will scan whichever I²C bus is set bybusNumberfor the devices.
IftryOtherBusisTruethen it will attempt to use the other I²C bus in the event it fails to find anything on the specified bus.x, y, z = ReadAccelerometer()
Reads the accelerometer for current force levels in the X, Y and Z axes, scaled in terms of G (1 G is the same amount of force as gravity).x, y, z = ReadCompassRaw()
Reads the raw flux values from the accelerometer in the X, Y and Z axes, which can be used to compute a magnetic compass heading (we will add functions to do this later).temp = ReadTemperature()
Reads the die temperature of the magnetometer (compass) chip, in degrees Celsius (°C).
This value is not absolute, in other words changes in temperature are correct, but zero is not actually zero °C.
To allow this to be corrected, the function internally addstempOffset, which can be set by the user beforehand to get real values.
busNumber
Specifies which I²C bus to use, future versions will determine this based on board revision.
TheInitfunction will try both unless told not to, so this value is not crucial.foundCompass
Set duringInit,Trueif the magnetometer (compass) was seen on the I²C bus,Falseotherwise.foundAccelerometer
Set duringInit,Trueif the accelerometer was seen on the I²C bus,Falseotherwise.printFunction
Used to set the function called with diagnostic messages.
If unset or set toNone, the library will use the standardprintfunction.
Set toNoPrintusingXLoBorg.printFunction = XLoBorg.NoPrintto suppress (turn off) the diagnostic messages.gPerCount
Set duringInit, this value is the minimum change in force registered by the accelerometer at the currently configured sensitivty level.
At this time this will be set to 2 G byInit, later we will add a function to configure the sensitivity level to 2, 4 or 8 G.tempOffset
Offset correction set by the user for temperature readings, this value is added to all readings usingReadTemperature.
#!/usr/bin/env python

import XLoBorg
XLoBorg.printFunction = XLoBorg.NoPrint
XLoBorg.tempOffest = 25
XLoBorg.Init()
if XLoBorg.foundAccelerometer and XLoBorg.foundCompass:
    x, y, z = XLoBorg.ReadAccelerometer()
    mx, my, mz = XLoBorg.ReadCompassRaw()
    temp = XLoBorg.ReadTemperature()
    print 'X = %+01.4f G, Y = %+01.4f G, Z = %+01.4f G' % (x, y, z)
    print 'mX = %+06d, mY = %+06d, mZ = %+06d' % (mx, my, mz)
    print 'T = %+03d°C' % (temp)
else:
    print 'Did not find both chips, run ~/xloborg/XLoBorg.py for more details'
Line 1: Tells Linux how to run this file if it has the execute bit set (see chmod for how to do this).Line 3: Load the XLoBorg library for use.
Line 4: This tells the library to not print diagnostic information.
Line 5: Tells the library that a temperature reading of zero actually corresponds to 25°C.
Line 6: Starts the XLoBorg module, this configures both chips ready for use.
Line 7: We check here to see if both chips were found, otherwise we skip to line 14.
Line 8: Reads the forces from the accelerometer.
Line 9: Reads the flux values from the magnetometer (compass).
Line 10: Reads the temperature (plus the offset) from the magnetometer (compass).
Line 11: Prints the forces read.
Line 12: Prints the flux values read.
Line 13: Prints the temperature read.
Line 14: If both chips were found skip to the end.
Line 15: Since we did not find both chips, print an error message :(
C Library
We also have a C version of the library, you can download and build it with the following instructions:mkdir ~/xloborg/c cd ~/xloborg/c wget http://www.piborg.org/downloads/xloborg/c-library.zip unzip c-library.zip makeNote that there is no installer, the Python library install.sh should be run first, otherwise the I²C drivers will need to be set-up manually.
Manual download: http://www.piborg.org/downloads/xloborg/c-library.zip
There are five files of interest here:
- XLoBorg.c
This is the source for the library, equivalent to XLoBorg.py - XLoBorg.h
The header for the library, include this when you wish to use the library - main.c
An example use of the library, provides the same output as XLoBorg.py run standalone - Makefile
An example makefile for building the main.c example program - XLoBorg
The output from the example makefile, run this to poll the accelerometer and magnetometer (compass) in a terminal

